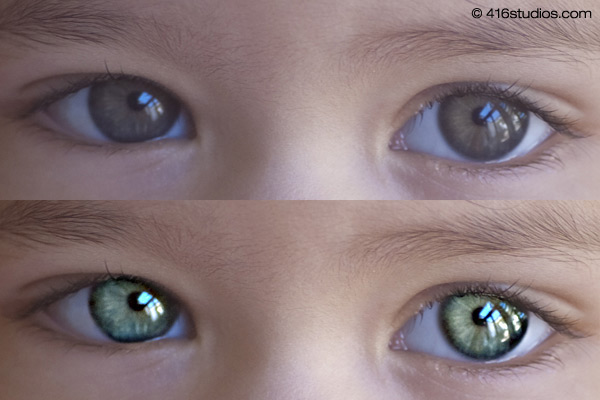
With this tutorial you can create amazing, bright eyes within minutes.
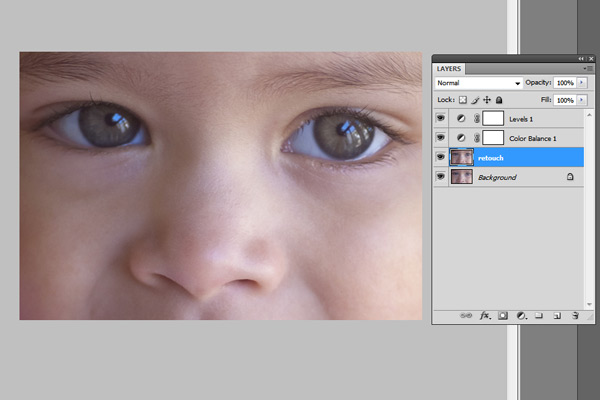
First retouch, adjust levels and do all necessary colour corrections on your image.
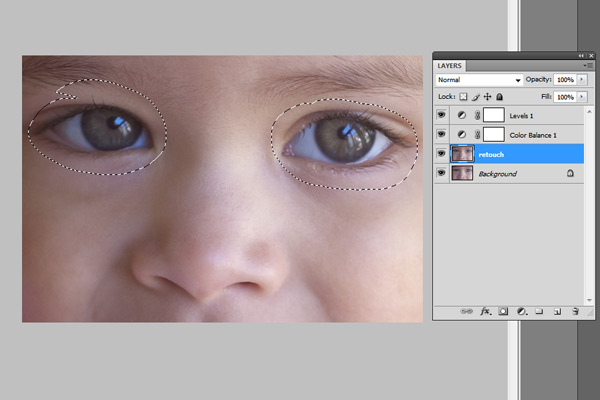
With a Lasso Tool (L) select the eyes (hold Shift key to add to selection). Hit Ctrl+J to copy selection to a new layer. You can copy the whole layer instead of selecting eyes but applying the filter to the large area like this may take a while on slower computers.
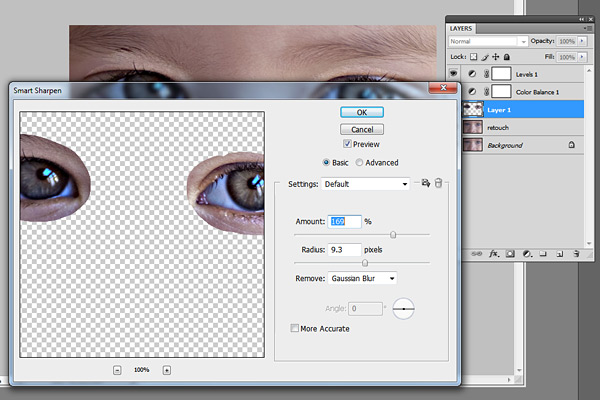
Use Smart Sharpen filter on the eyes, the choice of right settings will depend on the size of your file.
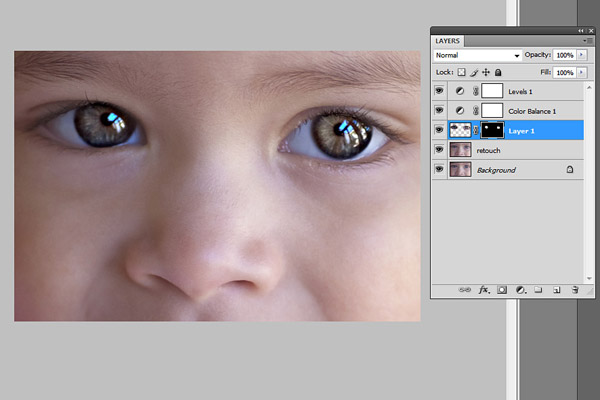
Add a layer mask to the sharpened layer, then using a white soft brush on 50% bring back paint only iris’ and pupils to expose the sharpened eyes. Reduce opacity of the layer if it is obviously too sharp.
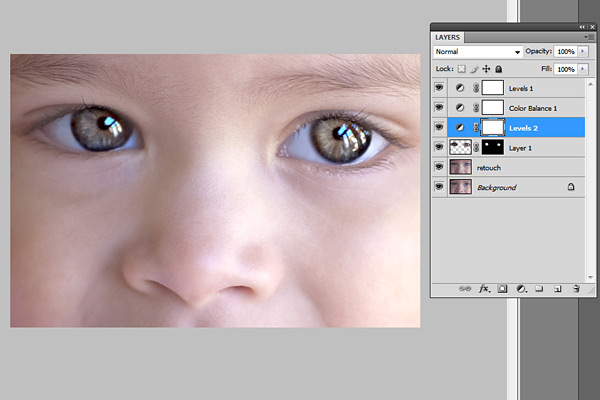
Using levels brighten the whole picture and then copy mask from previous layer to select only eyes by holding Alt while dragging the sharpened mask (“layer 1” in the pic) onto the “levels 2” layer.
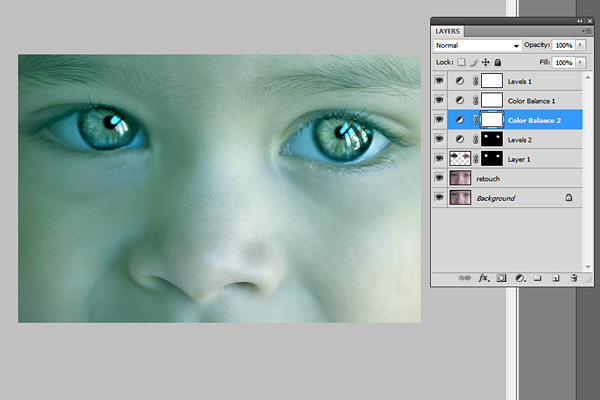
With a Colour Balance set desired eye colour, keep “Preserve Luminosity” ticked, again use copy of previously created mask to select eyes only.
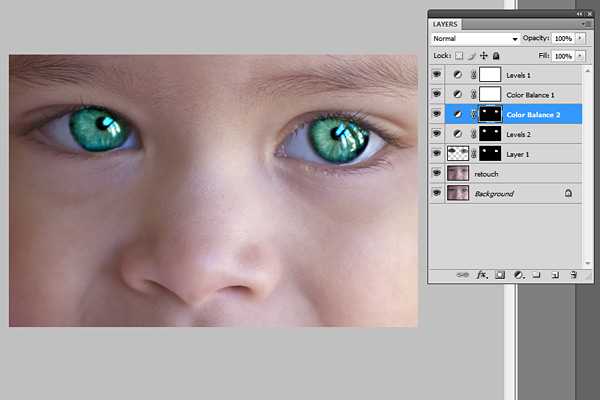
Reduce opacity of the colour layer to make the eyes look more natural. Optionally go back to the other masked layers to find the best balance playing with opacity.
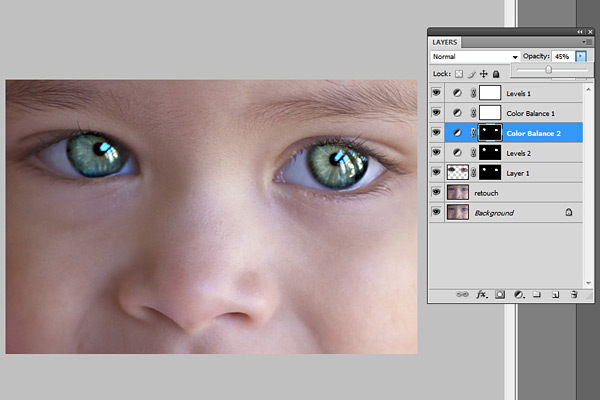
And voilà, the image is ready.
92 thoughts on “Eye Sharpening – Photoshop Tutorial”
Hello! I absolutely love this feature & would like to use it on a lot of my photos. However there are many, many versions of Adobe Photoshop & your tutorial does not include which version was used to make these alterations. I would hate to spent $100 to $200 on the wrong one so could you specify???? Is it PS Elements 9 or 10 OR PS Premiere 9 or 10. It would be great to only get one or the other instead of spending double to get both. Thank you so much!!!
Elizabeth
Hi Elizabeth. I just want you to know that I did the same tutorial with almost the same results with PSE10. The difference was that there is no Smart Sharpen, but instead it is Adjust Sharpness in the Enhance menu. Also, when copying the layer mask, there was a mini tutorial here
http://www.texaschicksblogsandpics.com/photoshop-elements-tip-copy-layer-masks/
which I found did the same thing. Or when you are making the layer there is an option that clips the previous layer mask. Hope that helps!!
With layering tools, that’s most likely photoshop CS4 or any version in that family
Thank you for visiting and your comments.
It does not matter which version of Photoshop as all of them have levels, colour balance and smart sharpen filter, even the Photoshop Elements.
Adobe Premiere is for video editing.
Hope it helps.
Nice and succinctly explained, but please tell me what is wrong with this child’s original beautiful brown eyes. Sharpening works well, but is there any reason green is better….
Thank you for your comment Magda.
Oh no, nothing wrong with her eyes. I like them in original blueish grey colour better as well… the green colour is overdone for the tutorial purpose.
Um i don’t think the kids eyes were brown in the first place. I’m pretty sure they’re a blueish-gray…
You sound like a drama queen when you bring up the child’s original eye color. Seriously? There’s tons of reasons, most of which are because of the bad quality of the original picture.
Or, for whatever creative reason under the sun that you might want to do this.
Thank you awesome!
Thank you!
Thank you so much for this. I have Adobe Photoshop Elements 8, I can’t seem to find the smart sharpen filter. Any idea as to where I might find it?
You can use Adjust Sharpness, it can be found in the Enhance menu. In many ways, it resembles the Smart Sharpen filter of newer Photoshop versions, but it doesn’t allow setting the strength of light or dark edges. So, it is not that smart. Still, it offers the basic sharpening options.
As a new user to photoshop, some of these terms are a little “above my head”! Would love to see a more step by step instruction – as I have been trying to get this right for the last hour! Getting lost with layers and the brush tool with lightening! Any good resource to get this?
Thanks!
Would the tutorial on “how to use mask” be helpful? We are planning to post it soon…
There are so many tutorials out there, you should really stop whenever you get stuck and find a tutorial on that very problem.
Most of us don’t want to see a ten-page step-by-step tutorial for something fairly easy.
Not knocking you, but if you are having troubles with this, then bookmark it and come back to it. You’ll be there soon if you practice a lot and do tutorials.
That was a good read. I like your use of the color balance layer, it makes them pop so much more.
sorry but they look fake… some retouching is good but this looks fake
I am using CS3 Extended. Have so many time saving changes come along that I need to fork out the $399 to upgrade to CS6Extended? Can I do these eye transformations with CS3 Extended?
PS Elements does not have smart sharpen or color balance layer in it, only the cs versions do.
I must be a total moron because I just can’t get this to work. I’ve tried it four times and every time I get to this part:
Using levels brighten the whole picture and then copy mask from previous layer to select only eyes by holding Alt while dragging the sharpened mask (“layer 1″ in the pic) onto the “levels 2″ layer.
And it simply doesn’t work. Holding alt while dragging the mask onto the levels layer gives me everything *but* the eyes, not the eyes themselves. I can’t figure out how to change this or what I am doing wrong. Frustrating!
I found that very hard to follow as well. That’s as far as I got.
i’m using an old photoshop (photoshop 6) and also have light room 4
i don’t have a smart sharpen. suggestion on how to do this with either of these programs?
THANKS!
ps looks good!!!
These are the dumbest comments I’ve EVER READ lmao is this like a spam commenter ?! Wtf … Seriously?
Hahahaha. Seriously. I was wondering that part too.
The human race, circa 2013
Does it make you feel smarter to put down other people who don’t understand everything that you understand. Because it doesn’t make you sound smarter. Just arrogant.
What I do is after the eyes are on their own layer info filter<high pass. Then use eraser to remove any extra that's outside if the iris. Then I change the layer style to overlay. Reduce o
Use filter high pass then change layer to overlay
I too, am fairly new to photoshop. So, for those who think that those are the dumbest questions ever, I must disagree for the ones just learning the photoshop program. Lordy, be a little compassionate for someone wanting to learn something new on such a program. I pick this up pretty easy and have learned a lot while following instruction for photoshop, but if you don’t know where to find things, it can be a bit frustrating to say the least and that is just getting familar with the program and using it over and over. I must say I was doing well with these instructions, but I also must say as soon as I got to the adding the layer mask is where I got lost as well. I google almost everything to learn this program and a lot of people write steps assuming everyone that reads them are familar with the program. For newbies it can be quite frustrating. I found the layer mask to add a mask or at least when I went to the layer mask my only option was to “reveal all or hide all” so unless I am in the wrong place, I am not sure from that point on exactly the steps. Everything from that point on seemed to be a bit confusing. Although I must say after doing the first steps up to that point certainly already made a difference in the eyes. Although I must agree I would like to keep my eyes the natural color of the person’s natural eyes, but also enriched. I guess I am off to google some more tutorials to see if I can figure this out completely. Thanks to people like you though who will post things like this for us “newbies” to become more proficient in this program!
What about using iphoto?
This was a great tutorial and obviously you adjust to taste. The author is just trying to give an example of what you can do with the eyes and was overdone for tutorial purposes.
Now in regards to this being over someone’s head, we’ve all been there. I suggest you learn photoshop basics first and then come back to this tutorial.
Nice….but It would be much better if the child ended up with the same color of eyes that he started out with. Hazel to green?
Reason I have a love hate relationship with social media, blogs etc…. People can type very rude things because they are not in front of an actual human being. That said, I love the pop of the brightened eye in captures. Great tutorial and for those who are beginners hang in there, you’ll get it.
I can be rude in real life.
i was wondering if ne one knows how to do this on paint shop pro 14
amazing…..
Is there a video of this? Apparently I’m retarded
would you kindly break down the step “Using levels brighten the whole picture and then copy mask from previous layer to select only eyes by holding Alt while dragging the sharpened mask (“layer 1″ in the pic) onto the “levels 2″ layer.” i know how to use levels. I do not understand how you copied just the layer mask. Thanks!
While I agree that some comments were, indeed, quite rude, the truth is that this post is specific to what is being done. To explain every nuance to those who are not yet experienced with Photoshop or whatever software you are using to the point where what is being discussed makes sense would make this post extremely long and even more confusing since you will be trying to grasp too many tools at once. The best thing you can do is to take what you are not understanding, and go to youtube and look up that particular step. You will find so much to teach you about what is going on here. To learn just enough about layers to make this particular process work will leave you only knowing a little bit about a very powerful tool. You have to learn how to walk before you can learn how to run. But here are a couple of things to think about: If you are painting on a black layer (as in her images above) you need to make sure you are using a white brush. Black conceals, white conceals. If you are painting on a white layer, you need a black brush. If you are getting a white mask automatically, alt+click on the “add layer mask” icon will give you a black layer mask. To copy a mask only, just click on the mask icon itself on the layer you have it on, and you should see a rectangle around it (look at the images above and you can see what I mean about the rectangle). Drag that to the layer you want it on. But you cheat yourself if you only bother to learn this much. Start easy and understand what everything does before you try applying it. This is a great tutorial but it’s not meant to be easy. And it shouldn’t be. You could wind up messing up your image more than fixing any issue.
I would add that photoshop is like a guitar and not a piano, meaning that there are multiple places from which you can get the same note.
I can think of ten different ways off the top of my head to get the same results.
This one is efficient because it utilizes non-destructive editing.
Sorry. Black conceals, white REVEALS.
I have a lot of red-eyes photos … I’m going to give this a try
wow, this was great. Can’t wait to play around with it and show off my hazel eyes.
I love it.
Buy the most recent, latest version.
This is a great tutorial and looks awesome. Thank you
Very attractive eyes.
Thanks I even wrote these direction in my Photoshop CS6 notes so that I will always have access to it. Thanks!
you should prob slow down on a couple of the steps, going through this myself i felt like all of a sudden there were five layers that i didnt even have that magically appeared
Nice tutorial, as much as the original looked nice, having them pop like you did really adds a bit more to the image. As a rule I rarely PS kids, but a little extra pop and the kids look so fresh…
Great article! Keep posting other photoshop related stuff! Thanks
i love it..
Can you elaborate on the step re: using a soft brush at 50% bring back paint only iris…… ? There seems to be some wording missing?
I love it! Thank You
Very helping and learning
Fantastic Work, Thank You.
Awesome,where have you been all my life!?
Love this. Thank you for the step by step tips.
I love this.
joel shaya friedman
I love it. it’s a nice photoshop
woow ,.this is really cool …thanx for providing this tutorial with images ..
nicely work done by you ..Such a great tutorial .
thanx .
Wow!!! Very nice. Learned something new today!!! Thank you!
Not bad
merci
Wow! Amazing.
i love it thanks for sharing
Best Article
Hi, Its really a great Photoshop Tutorial,Every Time i like to create different things, your tutorial help me. lot of thanks for this tutorial
Nice job on the tutorial. I liked the catch light in your example. BTW everybody be careful not to o over sharpen!
What can I say?You have a talent!Thanks for making it so clear-step-by-step.It will be a great resource page of knowledge.
This info is worth everyone’s attention. Where can I
find out more?
thanks for sharing
Thank you
very much for your posting!!! Best,
Very great
i love it
great tutorial! (but the green part a bit too much though )
)
Oh neat – I’ll have to try this trick on some pictures of my kids. I’ve never really focused on specific features, but I bet this would give a great focal point.
thanks for sharing
nice!
Thank you so much for this tutorial. It helped a lot.
keep the great job bro
I am always looking for faster ways to make the eyes sparkle. THANK YOU for sharing!
Thank you so much for this tutorial. It helped a lot.
Hi, Its really a great Photoshop Tutorial
so nice great work
Its fablous
nice editing
photoshop is very difficult in use really its a great post
Beautiful work. Thank you for sharing!
Nice tutorial, thanks for it.